Skip to content amazon-payments amex bitcoin cirrus discover fancy google-wallet interact jcb mastercard paypal stripe twitter visa diners-club dankort facebook google-plus instagram maestro pinterest rss tumblr vimeo youtube arrow-bottom arrow-right arrow-left arrow-top cross search user cart minus plus arrow-right-2 comment
An item was added to cart!
✖

Your Cart is empty.

Keep Shopping
  • Translation missing: en.layout.header.open_menu
    Menu
    • All Brands
    • Kirby
    • Prolux
    • Rainbow
    • Filter Queen
    • ProTeam
    • Ozone/UV
    • Education
  • 0
    Cart

GreatVacs

0
  • All Brands
  • Kirby
  • Prolux
  • Rainbow
  • Filter Queen
  • ProTeam
  • Ozone/UV
  • Education

KIRBY VACUUM POWER SWITCH REPAIR

+VACUUM CLEANER GUIDES

  • Kirby Vacuum Cleaner Guide
  • Kirby or Dyson - Which is Better?
  • Best Kirby Vacuum For You
  • Rainbow Vacuum Guide
  • Oreck Vacuum Guide
  • Kirby Vacuum Bag Guide (Which Bag To Use?)
  • Bags vs. Bagless Vacuum - Which is best?
  • The Best Vacuum Cleaner
  • HEPA Vacuum Cleaner Filtration
  • Picking the Perfect Commercial Vacuum or Cleaner

+VACUUM MODEL DIFFERENCES

  • Kirby Vacuum Guide - G Models
  • Rainbow Vacuum Models
  • Electrolux Vacuum Models
  • Tristar Vacuum Models
  • Filter Queen Vacuum Cleaner Models

+VACUUM USE & MANUALS

  • Kirby Vacuum Assembly and Use
  • Cansiter Vacuum Assembly and Use
  • All Vacuum Cleaner Manuals (Dyson, Electrolux-Aerus, Filter Queen, Hoover, Miele, Oreck, Rainbow, Riccar, Simplicity, Tristar)

+REPAIR & TROUBLE SHOOTING

  • Kirby Vacuum Brushroll Adjustment
  • Kirby Vacuum Fan Replacement
  • Kirby Vacuum Transmission
  • Kirby Vacuum Power Switch
  • Kirby Model Schematics

+VACUUM HISTORY

  • History of Vacuums Timeline
  • Types of Vacuum Cleaners

VACUUM FINDER

BEST VACUUM

Here at Great Vacs we sometimes get asked how you replace a kirby power switch. We are not liable for any mistakes or damages that you may do if you repair this vacuum yourself. Their are many reasons a power switch could go out but the main reason is its one of the few parts of a kirby that are made of plastic.

NOTICE - This website is ONLY for our customers and employees. If you have not bought from us you are not authorized to view this document. Also GreatVacs and any of its parent or child companies are not liable for any work you do on your vacuum. If your vacuum needs repaired or fixed in any way you need to send it to an authorized repair center. Any work done by anyone reading this document assumes all liability and risks to themselves, others around them and any property that may be damaged. Great Vacs has written this document for informational purposes only and assumes no risk or liability in any way. Thanks, Dustin

Disclaimer

All information that we have provided is third party information. The information contained is just what we have learned over the years from repairing and rebuilding kirby vacuums. All information and statements are merely our opinions. All official and technical information on kirby vacuums is not contained within this information. For that information you need to contact the kirby company or your local distributors. We are not a Kirby distributor nor are we associated in any way with the Kirby Vacuum company. We don't claim to include all information in this document but if there is something that you would like us to add, please let us know.

The main steps to adjusting the transmission is taking the vacuum apart to be able to get to the transmission. The following steps are how to take it apart. CLICK ON ANY OF THE THUMBNAILS TO SEE FULL SIZED PICTURE!

​

Kirby Vacuum

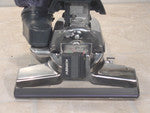
WARNING: NEVER ATTEMPT TO PERFORM ANY TYPE OF MAINTENANCE OR WORK ON THE VACUUM IN ANY WAY WHILE VACUUM IS CONNECTED TO A POWER SOURCE. DOING SO MAY RESULT IN ELECTRIC SHOCK. Remove the Powerhead To do this you will select your carpet height adjuster to its highest settings. Then spin the belt lifter so the two red arrows are pointed at each other. Then disconnect the head and take it off. Side note - when you are done and put your head back on dont forget to realign the arrows to green on green.

Kirby Vacuum

Remove the bag and handle Right where the handle goes into the actual vacuum it snaps out. To unsnap the handle their is a button on the back of the handle right at the base where it goes into the vacuum. To take off the bag put your hand under the boot mini emptor (plastic part at bottom of bag) and pull away from the vacuum and it snaps off. That is how you take off the handle and bag.
Kirby Power Switch Remove the trim around the Pivot handle The next step is to remove the trim around the pivot handle (where the handle snaps in). The first thing you want to do is to undo the screw at the bottom of the trim. The screw is located right above the transmission switch. Then you want to remove the screw that holds the cord under the trim. When that is off you want to unsnap the trim buy grabbing the bottom of it and lift up and at the same time push toward the front of the vacuum. The trim then comes off.
Kirby VacuumKirby Repair 
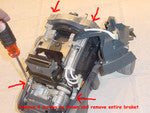
Remove the Metal Body With the powerhead and rear trim removed the 4 screws that remove the Metal body are now visible. First we remove the 2 on the rear of the metal that were covered up by the trim. Once those are removed we move to the front of the vacuum and remove the two remaining screws that are holding on the front of the trim. With the 4 screws removed now you simply lift the Metal body off of the vacuum.
With the completion of this step the vacuum is taken apart as far as we need it to be. Now the motor, transmission. and other main parts of the kirby vacuum are exposed.
Kirby Vacuum assemblyKirby Vacuum G4 Remove the pivot assembly and casing OK here we are going to remove the 4 screws and remove the entire casing and pivot assembly. This will open up the machine so we can work on it. REMEMBER when you are putting everything back together to make sure your linkage to the transmission is properly engaging. Also when pulling off the case their are 2 wires you will have to remove to have it fully off. REMEMBER wire order so when it goes back together it is done right.
Kirby Vacuum PartsKirby Vacuum Cord Remove kirby Switch fasteners We start with removing the foot pedal (where your foot turns the vacuum on and off. Then we remove the linkage between the foot pedal and the power switch. It removes from the powerswitch by swinging it all the way up towards the vacuum and then pushing down. Then we remove the screw that holds the kirby power switch to the vacuum
Kirby Vacuum schematic Wiring

Now we work on the wiring their is 3 wires that we want to remove. For this procedure I usually use a needle nose plier. You can go ahead and pull the 3 wires out of the switch. VERY IMPORTANT - Remember where they go and in what order. One of my first times in exchanging a switch I wired it incorrectly and sent it to a customer. When the customer received it the vacuum ran backwards! Lets just say they were not to amused :) With the wires out we are now ready to remove the switch.

Kirby Vacuum Power HEPA Removing the Kirby Switch This next step is going to take some common sense and instinct. I cant describe everything but you can figure it out. So all the fasteners and wires are removed now it is time to take it out. First we pull the whole switch back about an inch and a half. Then we pull it up in the direction of step 2 shown in the pictures. If their needs to be some more clearance push the two safety switches down for more clearance.

Now the switch is out. We simply reverse the process. Sometimes to get the switch in and out there has to be some wiggling and maneuvering to get it in and out. So now you put the new switch in and put the wires back (not so easy sometimes) and the screw. Then you reconnect the linkage to the foot pedal. When you put the pivot assembly back on don't forget to align up the linkage to the transmission so the transmission works correctly. Then put the rest of the vacuum back together and you are done. This is a good time to congratulate yourself, this is one of the hardest repairs to do on a kirby :)

SERVICE@GREATVACS.COM

POPULAR COLLECTIONS

hat
tank
Apparel
Apparel

Links

  • All Brands
  • Kirby
  • Prolux
  • Rainbow
  • Air Purifiers
  • Education
  • Parts
  • Greatvacs Blogs
  • Delivery Policy
  • Terms Of Service
  • Privacy Policy
  • Refund Policy

Information

  • Kirby vs. Dyson which is better?
  • Best Model of Kirby Vacuum Cleaners?
  • Best Model of Rainbow Vacuum Cleaners?
  • Best Vacuum Cleaner for You - FREE ADVICE!
  • How to pick a commercial vacuum?

Help

  • About Us
  • Contact Us
Shopify secure badge

POPULAR COLLECTIONS

hat
tank
Apparel
Apparel

Links

  • All Brands
  • Kirby
  • Prolux
  • Rainbow
  • Air Purifiers
  • Education
  • Parts
  • Greatvacs Blogs
  • Delivery Policy
  • Terms Of Service
  • Privacy Policy
  • Refund Policy

Information

  • Kirby vs. Dyson which is better?
  • Best Model of Kirby Vacuum Cleaners?
  • Best Model of Rainbow Vacuum Cleaners?
  • Best Vacuum Cleaner for You - FREE ADVICE!
  • How to pick a commercial vacuum?

Help

  • Contact Us

GreatVacs Copyright 2018

GreatVacs

Shopify secure badge
0

100% Refurbished to like new condition! - Even though this vacuum was in great condition and ran perfect, so it would qualify for our 5 year warranty we have rebuilt it with all new bearings, seals, motor parts, attachments, belts, brush roll, and too many other parts to mention.

  • Choosing a selection results in a full page refresh.
  • Opens in a new window.
  • Translation missing: en.search.autocomplete.starting_at
    Translation missing: en.search.autocomplete.see_all ({ suggestion.results_count })
★ Reviews

Let customers speak for us

10025 reviews
Write a review
84%
(8381)
13%
(1279)
3%
(306)
0%
(17)
0%
(42)
S
DEMO New Comfort Stainless Steel 9,000 to 14,000 mg/hr Commercial Ozone Generator and Air Purifier
Steven Worsley (Spanish Fork, US)
Great Machine!

We use ozone machines on a majority of our projects and this machine is awesome!

S
Wessel Werk RD285 Universal Hard Floor Tool
Scott Noyes
The best of the best!

I own 4 Prolux machines and they are quite simply the best product on the market today!

M
Prolux Uprights Post Motor Filter - 6000, 7000, 8000 and 9000
Mary (Spencer, US)
The importance of filters

I didn’t even realize that my Prolux 8000 had a post motor filter until I read one of the helpful and informative emails from Prolux about the need to change your filters to keep your vacuum in good working condition. I had already replaced the other filter. I checked out the post motor filter and it was definitely overdue for a change. Thank you Prolux for your educational emails.

P
DEMO Prolux CTX Water UV Canister Vacuum and Air Purifier with Lifetime Warranty
Pamela J. (Decatur, US)
Prolux water canister vacuum

I am very impressed with the power and suction. Not to mention how much dirt that was in the water bowl! Yikes. But best of all is how easily it follows me around as I clean. Smooth and no struggle at all. I highly recommend this vacuum.

L
Prolux Phantom Bagged Canister Deep Cleaning PET Vacuum with Powerhead for Home
Lori R (Laurel, US)
RS7PET

Overall a well built vacuum for our needs. I would like better edge cleaning without having to stop and switch to the tool to clean under cabinets and corners.

123